Mabinogi World Wiki is brought to you by Coty C., 808idiotz, our other patrons, and contributors like you!!
Keep this wiki going by contributing to our Patreon!
Mabinogi World Wiki:Media Guide
To return to the Editor Hub, click here.
This page is the reference for pages dedicated to Wiki Media.
Details
Always keep in mind the Policy first and foremost when uploading media of any kind, although most of its guidelines will be mentioned here as well.
As a general rule of thumb, Media mentioned in this page may refer to:
- Static image files, be they jpgs or pngs;
- Gifs or animated png files;
- Videos hosted on the wiki;
- MP3s and other BGMs;
- Etc.
Media, except for videos, must be hosted on the wiki. Do not use Imgur or other similar image galleries to link to or from.
Do's and Don'ts
Before you upload media for the wiki please understand the following:
Do not:
- Use Game Simulator Images to submit media;
- Use the in-game preview window to submit media;
- Upload any picture with mods being shown;
- Upload media with text in other languages than English;
- The only exception should be for merchandise and foreign-only assets.
- Upload pictures that have been edited beyond cropping
- If it's an instructional image that requires some text, that is fine, of course. However, don't add fluff like outlines or smiley faces;
- Upload any media with your In-Game Name in it
- The only exception is if the image is being uploaded on your personal page, in which you monopolize yourself there;
- Upload images that bear too many distractions from the subject covered. This includes distracting items, such as Glove of Extravaganza, Abnormal Skin colors, Bad lighting, character-worn colors too similar to the showcased item to the point it melds together, Title Effects and other things, complex backgrounds, too much excess, use of gestures100 or other unnecessary text.
- Upload media with other people in it;
- Upload media of characters in underwear
- As it may be inappropriate to some viewers, please wear plain clothing when taking pictures of other things;
- Upload full, unedited media taken with the Prtsc button;
- Upload media picturing in-game content that is dyed in fast flashing colors;
- Upload anything with a monochrome color scheme. (e.g. All one shade of a color, not necessarily just black and white)
- Upload anything with pure black and/or white unless it cannot be dyed. These colors usually alter the texture of items
- Use bright colors that may transition into white under certain lighting conditions;
- Same applies for dark colors that may transition into black under certain lighting conditions.
- Wear guild robes unless you are planning to replace the Guild Robe pictures;
- Upload media that exceeds 10 MB in size. See here for more information.
Be mindful of your fellow editors and take the proper time to upload a good picture, seek help, or upload none at all.
Do:
- Take outdoor media at the Optimal In-Game Daylight times: 12:00pm to 2:00pm;
- Opt for uploading a .gif of the equipped pose instead of a png if a piece of gear has an animation
- See Sweet Dreams Wig (F) for an example;
- Upload PNGs over JPG files, unless those are official images sourced from Nexon themselves;
- Take equipment pictures with an average-ish body type;
- Take equipment pictures with a character that is at least 17. This helps retain detail.
- Extreme body fat or muscles is to be avoided. As long it's close to the freshly rebirthed state, it should be fine.
- Resize your files, if you happen to play Mabinogi on a large monitor. This helps keep file sizes under control.
- Reach out for advice if you are unsure whether a file is ok or not.
- You will generally get a fast response by reaching out in the #Mabi-Wiki channel on the Mabinogi Official Discord.
Avoid:
- Clipping issues when taking pictures. We do not want to see any of that!
- Character weight/muscle that differs too much from the freshly rebirthed state; weight and muscle may alter the look of outfits.
- Hairstyles that cover the back view of an outfit;
- Use short-haired wigs or hairstyles when taking equipment media to ensure the hairstyle will not be in the way;
- Outfits that have socks, stockings or leg tattoos when taking pictures of Shoes;
- Some clothes will clip the Shoe slot. Avoid these as well.
- Long-sleeved outfits, outfits that have arm bands on the wrist, or sleeves that cause the glove to distort anything that covers the forearm when taking pictures of Gloves;
- Wear something that shows your arms and keeps your character clothed, such as Popo's Shirt and Pants for Humans and Elves, or any Newbie Wears.
- Having your hairstyle interfere with a Headgear's details. Use a wig if necessary, for all angles.
- Uploading media files with a capitalized extension, such as .PNG or .GIF. Use full lowercase.
Game Settings for Quality Picture Uploads
The following settings should be applied to your game in order to help ensure the media quality will be at its best:
Game Options
- Names hidden (Default keys CTRL+N)
- Interface hidden, if it cannot be cropped (Default keys \)
- Outline rendering Off
- However, some things may warrant it, such as the Halloween Witch Robe.
- Glow Effect Off
- Film Style Post-Shader Off
- This adds a color filter that alters the final look of the game.
- VFX Off (In the case of showcasing Special-Upgraded or Erged weapons)
- Hide Quest Info. You can access this by going in Options > Game Tab and checking the 'Hide Quest Info' checkbox.
- This way, all quest markers on the map, the blue quest arrow next to your character's feet, and quest markers above NPCs will disappear as long as the box is checked.
Locations to take your screenshots at
Due to the game's light effects, the following locations are strongly recommended whenever you need to take preview pictures of something:
- Dunbarton School, in front of the statue. This is the base default of the Mabinogi World Wiki.
- Dunbarton School, facing the left door, in order to make use of its black background.
- Some items with transparency may be affected by this and should instead be previewed elsewhere.
- The Crossroad, between Erinn and Tir Na Nog. The black background allows for previews of bigger items than the black door of the Dunbarton School.
- Remember you can save a location or use a Warp Imp's skill set at the crossroads to make it friendlier to reach.
Avoid the following:
- Most Dunbarton indoors
- Simon and Manus's places have colored light in their buildings.
- Taking outdoor pictures in general for equipment; most things do not warrant it.
- Taking outdoor pictures at evening/night time, unless a 'glow' effect is being showcased.
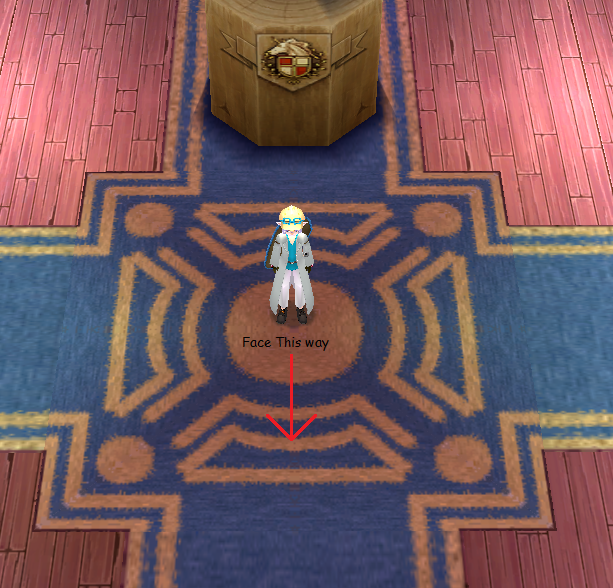
Go into Dunbarton School Library and stand in the center of the floor pattern in front of the statue.
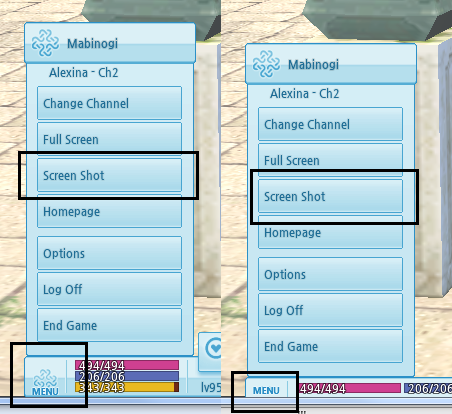
Enter Screenshot mode via the menu on the lower corner. Resize your client window to the largest area possible.

Use Ctrl+N and Ctrl+P to hide all names and parties. This is used for privacy reasons.

Use the \ key to hide all windows.


How to take a picture
Posing
- In order to avoid a 'tilted' effect to your screenshots, make sure to center the character on your screen.
- This is easier to achieve if you are using Screenshot Mode; see here for more details.
- Playable characters all have three different basic idle stances; however, for giants, only one is actually useful for showcasing equipment on wiki.
- If you use a stance-altering item such as a Stance Card, or if your outfit has an Idle Pose, use an invisible weapon such as a Handicraft Kit or a Tailoring Kit, which will give your character a basic stance without making it seem that your character is holding something.

For humans and elves, there isn't much difference between open hand and closed fist; just avoid the side leg pose.

For male Giants, type 2 would seem acceptable, but it alters how the legs look and gives the pose a slightly sideways look.

Female Giant poses need to be the bare basic.


Media content
- Try to use plain clothing. The Newbie Set or Special Newbie Set wears are safe bets to fall back to.
- Unequip any title effects, wings, weapons, accessories such as hats and halos, and any other things unrelated to the subject of the media taken.
- If you are showcasing a weapon that has been special-upgraded, remember to turn off visual effects.
File Types
- Make sure every static file preview is a .png file. jpgs are a lossy format and detailing can get lost.
- The only .jpg files on wiki should be media provided by Nexon for event banners, concept artwork, etc. Static media taken by users should default to a png.
- Do not use capitalized extensions; the wiki prefers lowercase (".png") files over uppercase (".PNG") files, as most, if not all, the templates used on the wiki is of the lower-cased extension.
Tools for sampling media
- The Snipping Tool on your computer or tools such as Puush;
- Video recorders, such as OBS Studio or the in-built video recorder of Mabinogi;
- Gif makers, such as ShareX;
Optimizing your media
Got a picture to submit to the wiki? Great! Before uploading it, though, make sure it is optimized:
Optimizing static media
- Crop unneeded parts of your media; extra bits and pieces around a character, the space outside the showcased window, etc; keep the media focused on what it is meant to depict.
- If the image is part of a set, like for outfits, the cropped height should be roughly the same.
- Make sure to downsize it if you are using a large monitor. Some files, such as the ones found on the multiple area pages such as Tir Chonaill, may warrant a higher resolution, but these shouldn't be the norm.
- Generally, a 250px wide picture will be good enough for most purposes.
Optimizing gifs
About Gifs
Make sure the gifs you upload do not exceed 10 MB in size. This includes your personal User space! You should aim to have the best quality / file size ratio possible!

- You may use any tool of your preference for recording, as well as any gif makers, as long as no watermarked text or things outside of the game are seen on the final file.
- Sharex and EzGif, two free tools that can be found online, are decent enough on their own.
- If you have a wide monitor, make sure to downsize any gif you take.
- Looping the gif seamlessly from end to beginning is entirely up to preference.
- Try to avoid compressing the gif to the point it has a visible grainy texture.
Tips
(If you are using EzGif, do these in order)
- Crop the unneeded parts of the gif.
- Resize the gif.
- In general, outfit idles and the like can be downsized to about 250 pixels wide.
- An equipment piece preview generally does not warrant being larger than 300 pixels wide.
- In general, outfit idles and the like can be downsized to about 250 pixels wide.
- If the file still exceeds 10MB by then, opt for lossy gif compression or removing xth frame.
- Frame removal should be the very last recourse, as the speed of the gif may end up altered. If you use this option, adjust the playing speed of the gif to set it back to how it used to be.
- To have more control over the capture, you may instead use the in-game recorder Mabinogi has or record a video of the thing you intend to make a gif of.
- This is especially handy if you are trying to get a gif of something that has a short time frame, such as the critical effects of a Spirit Transformation Liqueur.
- You can then resize the video player and record your gif on top of it.
- Do not use and upload gifs found on the Mabinogi NA website, as these are on the lower end quality and have a grainy texture. Their purpose is one of demonstration, and are unfit for wiki showcases.
Videos
Videos may be uploaded to Youtube and then linked to the wiki by using the Youtube Template.
- Make sure the video is on-topic, and professional-looking for the topic it covers.
- If you wish to showcase something short in time, consider making a Gif out of it instead.
Using Screenshot Mode
See this page for how to control the camera when using screenshot mode.
Using the Dressing Room
About the Dressing Room
Owning the item is still better, since you might get a slight 'tilted' effect with the dressing room, baa-t it's not always realistic due to unreliable releases or crafting requirements!
With the dressing room, most equipment can be previewed. However, if you wish to use the dressing room to upload media of items, keep the following in mind:

- Re-roll the item so it has an acceptable color palette to wiki standards.
- Don't use the dressing room to showcase small headgear, gloves and shoes.
- The dressing room limits camera movement while it is active, and these things require specific angles.
Taking Inventory Media
- Make use of the Images category and the advanced search to verify if an inventory icon already exists.
- Do not use the Auction House Previews for items bigger than 3 inventory slots in height. The preview window squishes the item.
- You may make use of the Icon Cleaner here to automatically clean your preview.
- Make sure to read the instructions and triple check the item's file name before clicking 'upload'
Taking Media of Equipment
General
- Make sure your character's colors (skin color, hair color, etc.) do not hide or mingle with the piece showcased to the point it can be indistinguishable from each other.
- If a piece of gear has an animation, opt for uploading a .gif of the equipped pose instead of a png.
Headgear

- Use an alternative hairstyle if your current hairstyle interferes with the headgear's details.
Gloves
- Do not strip down to gloves only. Wear something that shows your arms and keeps your character clothed, such as Popo's Shirt and Pants for Humans and Elves, or Newbie Wears.
- Avoid clothes with long sleeves, arm bands on the wrist, or sleeves that cause the glove to distort anything that covers their forearm.
- For the 'Angled' pose, you can use the basic bare-handed combat stance to showcase both hands at once.
- The hands of an elf/human female character will not close into fists; use this to your advantage if the glove showcased has specific ring details that would match better on an open hand.
Shoes
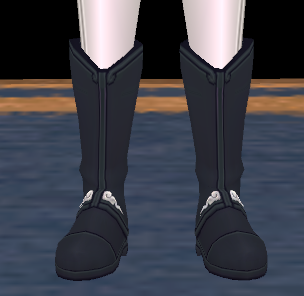
- Use Screenshot Mode and pan down on the shoes. This will center the view.
- Avoid wearing clothing that has socks or other leg decorations.
- Boots will usually cover the socks if the socks are small enough.
- Some clothes will clip the boots, while others remove anything above the ankle entirely. The Style Suit (F) is a prime example.
Weapon Appearance Scrolls
- Refer to the Weapon Appearance guide page to know how to build those types of pages.
- If the weapon has an animation, opt for uploading a .gif of it. The Electric Chain Blade Appearance Scroll is a perfect example of this.
Spirit Transformation Liqueur
- Refer to the Spirit Liqueur guide page to know how to build those types of pages.
- Upload .gifs of both the idle effect and the critical effect.
- Try to use a generic area to showcase the critical effect of the liqueur, such as the hall of Shadow Rath Royal Castle, or the northern area of Tir Chonaill with the foxes.
- Use a black background or the Dunbarton School statue for the idle showcase.
- Some liqueurs's critical effect may be better showcased during night time due to their palette.
- While galleries for spirit liqueurs are welcome, only use them for the idle effect with different weapons, as the critical effect would remain the same.
Idle Poses/Animations
There are a few things to consider when recording and uploading idles:
- Some outfits use idle poses that already existed before their release. Some of them not necessarily being in the same item set as well, such as the Majestic Knight Armor and Special Altam's Armor (M).

While being more recent, the outfit was given the Majestic Knight's idle.
This makes two files with the same purpose.
_Pose.gif)
- When this occurs, the first uploaded gif of that specific idle should be put on the other pages.
- This helps reduce the amount of duplicate files on the wiki as a whole.
When recording an idle pose, keep in mind your surroundings; opt for a black background or the Dunbarton School statue. Extra bits in the gif will add to its weight. After recording the idle pose, always optimize your file before uploading it to the wiki. See the Optimizing section above for how to optimize your idle showcase.
Taking Media of Homestead Props

_Equipped_Front.png)
_Critical.gif)
- Set down the prop in a piece of your homestead without any other prop obstructing the view.
- This can be on the edge of your homestead.
- Use screenshot mode and pan your camera roughly so the item lies in the center of your screen.
- If the item has variants, make sure to showcase the difference between them in a single picture that regroups all the props.
- In the case an item is bigger or smaller than expected, you can use a regular item such as a Homestead Daffodil or a Fir Tree to showcase the comparative height of an item.
Taking Media of NPC models
- Use Screenshot mode, and center the NPC on your screen. Use a front view, panned to around the NPC's chest. Make sure the NPC is captured properly from head to feet.
- Avoid uploading a picture that is taken with the camera at an angle, at night time, or that results in a 'slanted' standing pose.
Taking Media of the User Interface
- Avoid bright-colored UIs with text that is similar in color to its base. This can make the showcased text harder to read for some people.
- The Neon Green interface makes up the most of the interface pictures on the wiki as of writing this section. It is recommended to keep using it to keep uniformity.
- In the case of interface pictures uploaded for archival purposes, such as removed systems or changes of the UI that can no longer be seen, the color matters less.
- The Neon Green interface makes up the most of the interface pictures on the wiki as of writing this section. It is recommended to keep using it to keep uniformity.
- Make sure to only capture the interface window. You may crop the picture as needed, as some windows are not perfect squares or even.
How to upload Media
There are two methods to get to the file upload page:
- The 'Upload File' tool on the sidebar at the left;
- Clicking certain empty templates or links
Upload File Option
About direct file uploads
If the file name has already been set for instance in a gallery section, you may copy-paste the text that shows from the gallery to the file name field of the upload page. This way, errors are less likely to occur!
- Grab your file from the 'browse' button. By default, the file name will be named as the file is called from your source.
- Review the file name to fit with what you intend, along with the naming conventions, if there are any.
- File: must be excluded from the name.
- Extensions should ALWAYS be in lowercase.
- Tip: Look at similar files in order to learn the 'pattern' of how they are named, to keep uniformity on file names. This includes caps as well.
- This will make multimedia search simpler for other users, should there be a need.
- Use the summary box to give any relevant file information, if it is needed. This includes:
- The category the file should belong to;
- The source of the file, if it is official material from overseas;
- Any other thing to note about the file.
Template/Link Method
About image categories
use and reference Category:Images to know what category to assign a file, if needed!
- Clicking certain links, such as a pre-filled thumbnail without an image, or an outfit preview gallery, will take you automatically to the 'upload file' page, with the correct file name already pre-filled.
About replacement uploads and image reversions
When replacing a picture on the wiki, the browser cache usually takes some time to show you the updated picture. To reload the page, use Ctrl+F5 to do a hard refresh of the page and see the picture you uploaded. This also goes if you are reverting an image to an earlier version.
File names and categorization
- You may add a file summary, or assign a category to the image after uploading it through the 'edit' button on the file page.
- Note that the "Summary" field on the upload page will permanently show the comments and categories you put there unless the file is deleted.
For Nexon-sourced files, check similar pages that use the same type of file that you are using and correct the file name before uploading it.
- Nexon's naming of files tends to be archaic and thus makes file search difficult. Use the wiki's naming at all times.
Without namespace assigned
If the file has no assigned name on wiki pages, look for similar images to what you are uploading.
- Use the same naming system in the Destination filename field.
With namespace assigned
If the file already was assigned a name on a wiki page, copy and paste that file name onto the Destination filename field.
- The original name of the file can be different from this; what matters is the destination filename field.
- The file's extension must match the originating file, however.
- If you are copying a file name over from a wiki page that ends up using a different extension, you will need to correct the extension on the wiki page as well.