Mabinogi World Wiki is brought to you by Coty C., 808idiotz, our other patrons, and contributors like you!!
Keep this wiki going by contributing to our Patreon!
User:Seecret/MiniGuides
- {My #1 favorite wiki rule of all time: Remember to have at least 30 positive contributions to the wiki before making a userpage!}
- Feel free to correct grammar issues and more.
♥♥♥♥♥♥♥♥ Image Guide ♥♥♥♥♥♥♥♥
- NOTE: If you are replacing an image and are not improving it using any of the reasons below, you are about to make an UNNECESSARY REPLACEMENT, which is not tolerated by Mabinogi World Wiki.
Rule #1: Other Equipment or Skills
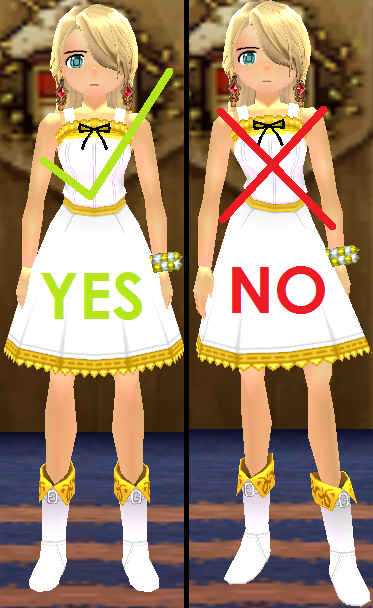
- Make sure nothing else is equipped or sheathed during the process of taking the image (Weapons, Shoes, Gloves, etc.)
- When taking an image, make sure you're not using a skill or have an ego equipped. This rule applies UNLESS you are doing an image for a skill.
- Make sure you don't do an image with your character naked, it isn't against the policy but not many people like seeing "in-game nudity" (trust me I found out the hard way).
- When taking an image of gloves or a sort of weapon, make sure you don't wear an outfit with sleeves.
- When taking an image of shoes, make sure you don't wear an outfit with stockings, socks, or pants that may cover or go underneath.
- If your hair is long and covers a part of the item you're taking an image of, use a hat that can crop the hair out.
- If only a little part of your hair covers up the item you are taking an image of, it isn't considered "replaceable".
- Do not crop your head off completely, it becomes like those creepy headless mannequins in a store.
Rule #2: Image Quality
- It is preferred that you take your images with great lighting, which actually means taking the image at a certain time of day (if outside). The lighting from an inside building (Dunbarton School for example) is the best for some nice image quality!
- Turn off any effects that could harm your image such as glow effect, etc.
- ALWAYS remember to upload your image in a .png format so that the image is less grainy.
- Make sure the item has no black/white on it (INCLUDES ANYTHING VERY CLOSE TO THE COLOR) since it does not always show all details in the item.
- Blending colors are definitely a no-no for images, because it makes it hard for players to distinguish what parts can be dyed.
- Keep the outline rendering off, it makes the images look more clean.
- Try to keep Film Style Post Shader off, it makes all colors faded/darker and it produces lines on the image.
- Make sure you are in a firm standing position UNLESS you are doing an image of an action item (which means no Royal Alchemist poses, etc.)
- When taking an image, a good way to get most of the background out is by using the Snipping Tool method found in Lexis' guide above (which is what I use myself), but you can also use the method of PrtSc also found in Lexis' guide.
- Do not let any bars get in your image. An example for this would be an announcement scrolling at the top of your screen. This rule also applies for those little icons beside your title.
Rule #3: Credit and Fame
- Giving credit for an image you post on the wiki is only tolerated in a few occasions, but best not to give credit on the wiki anyways!
- Try not to let anyone else get in your shot for your image; it makes everything very messy!
- Never include your characters name in the image, otherwise it is declared an image for showcasing yourself.
- It is okay to use another person's character as a "model" for an item you are taking an image of, but most of the time the images will come up at sort of an angle, so it isn't always recommended.
Rule #4: Angles and Differences
- If there is a difference between both sides of an item you are taking an image of, make sure you include both sides. An example for this would be the Belmont Hat (F).
- When taking your image, try not to angle the pictures wrong. For example if you are doing a "front" image, make sure it doesn't look too much like the "angled" version.
- Keep your images consistent, nobody likes seeing the same item in different areas, forms, or colors. It makes it confusing.
- Make sure your model isn't overweight, this might mess with showing how the size of an item really is.
Additional Tips
- Placeholders ARE allowed in most cases, but only if there isn't already an image.
- DO NOT upload the wrong image! But... if you do, just remember to fix it afterwards.
- If your image does not show up right away, please do not try continuously reverting back to the last, it should show up later on.
{Will Add More When It Comes To Mind}
♥♥♥♥♥♥♥♥ How to Work the Wiki ♥♥♥♥♥♥♥♥
These tips on how to work the wiki are mainly based off of what questions I've been asked by players in-game
- NOTE: I do not have every tip here for you, and I also may not know as much as you think. I'm still learning, too, after-all!
Talk Pages
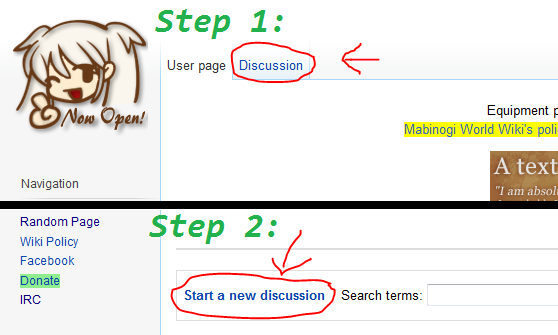
- It's always best to ask on the wiki about something you feel concerned about, so in order to do that, you must learn how to start a discussion. Every page has a "talk page", which is located near the top of the page on the left called "Discussion". After you click on that button, it should take you to the desired "talk page" where you can choose the option to "Start a new discussion". After pressing that button, you should be free to ask away!
- In addition, please do not spam any talk pages.
Images
- Adding and/or replacing images takes quite a few steps, so in order to help you with the process, I have set up those steps.
- Please remember when replacing images, make sure you have a proper reason for replacement.
- Always check the Image Policy before uploading a new image.
-Replacing Existing Images-
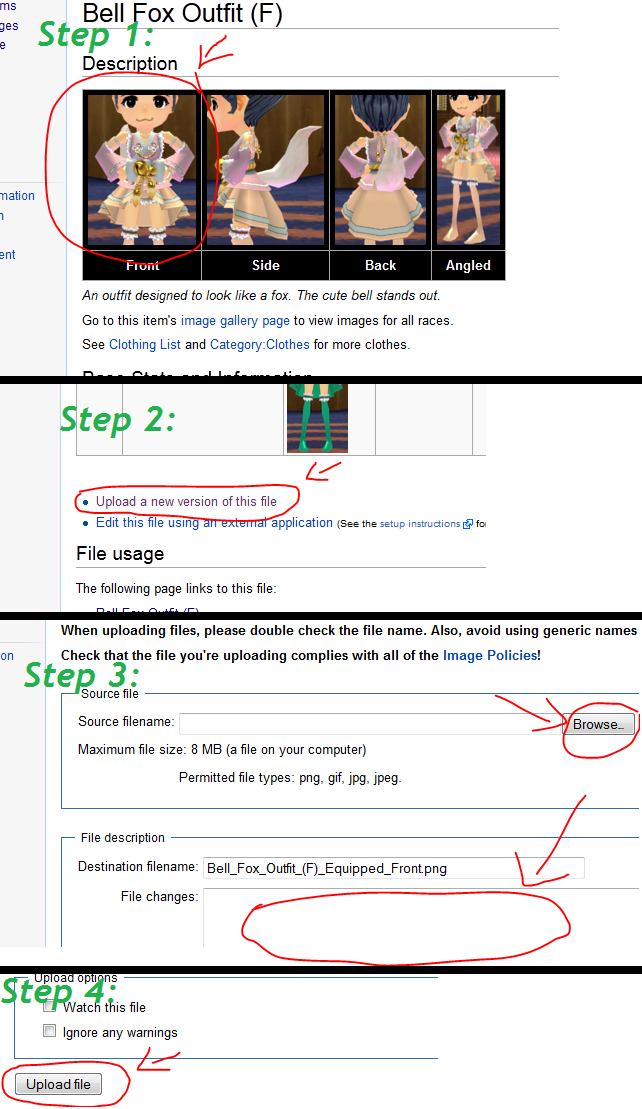
1. Go to the page where the image is located and click on the image you wish to replace.
2. Scroll down to the bottom of the page and press "Upload a new version of this file"
3. Click the "browse" button and select the image you wish to replace with, then add a quick summary or reasoning as to why you are replacing.
4. Once again, scroll down to the bottom of the page, but this time click the button that says "Upload file".
-Uploading New Images-
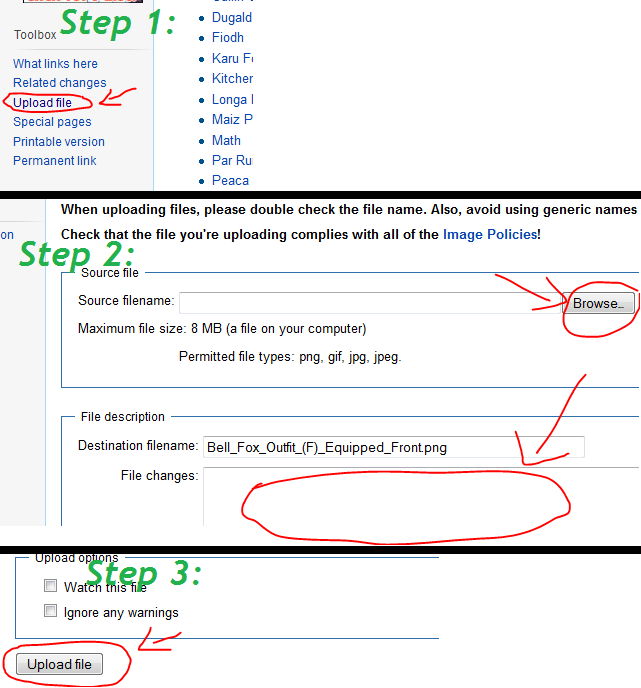
1. On any page, scroll down the page until you reach the button that says "Upload file" on the left.
2. Click the "browse" button and select the image you wish to upload, then you can choose whether or not to type in a quick summary of the image.
3. Scroll down to the bottom of the page and click the button that says "Upload file".
Making an Edit
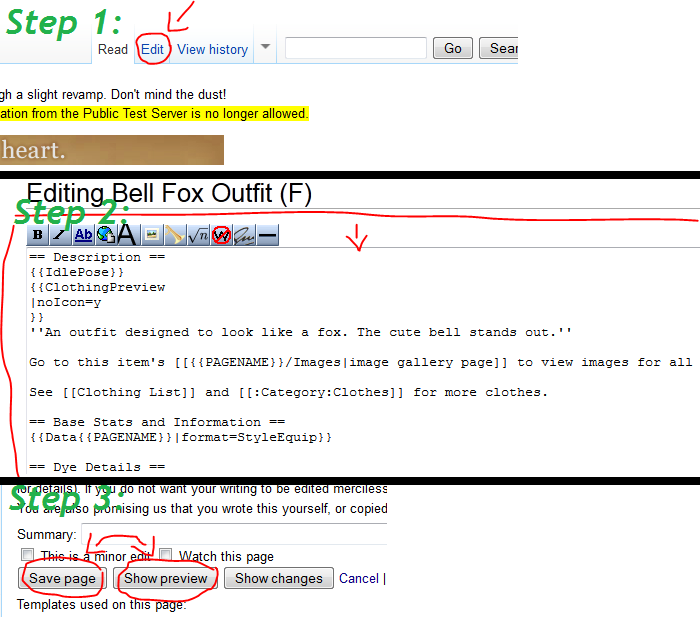
- Making edits to pages on the wiki is key, and helps keep it up to date and clean! At the top of a page you wish to edit, there is a button that says "Edit" near the search bar. Click that and you are on your way. Once you have clicked the "Edit" button, you are now free to edit the page to what was needed. Once you've made your edits, there are two options at the bottom of the page to choose from; "Save Page" and "Show Preview". It is always best to click "Show Preview" before saving your changes, so make sure you do that!
- Please note that making any vandalism to pages will result in a ban.
{Will Add More When It Comes To Mind}
