Mabinogi World Wiki is brought to you by Coty C., 808idiotz, our other patrons, and contributors like you!!
Keep this wiki going by contributing to our Patreon!
Category:Commerce
- For the enchant, see Commerce (Enchant).
Basic Information
| Current Season |
|---|
| Alban Heruin Season 1 |
| Jul 3rd, 2025 - November 6th, 2025 |
Commerce is a system that utilizes a unique form currency known as Ducats to purchase specialized goods to sell for profits via transporting them between the towns of Erinn, while avoiding being ambushed by bandits, who aim to steal the player's goods. Players can use their profits to purchase or rent improved transportation methods which have increased speed or load-bearing capabilities.
A successful trade will merit the player ![]() Ducats,
Ducats, ![]() EXP,
EXP, ![]() Gold, Merchant Rating for the town the goods originated from, Seasonal Commerce Score, and skill training experience for
Gold, Merchant Rating for the town the goods originated from, Seasonal Commerce Score, and skill training experience for ![]() Commerce Mastery.
Commerce Mastery.
- The reward is relative to the selling price of the goods in question.
Generally players will make more profit if they travel farther. However, the Bandits will become more powerful as well, so players must be more cautious to avoid them.
- Fast Travel, such as Moon Gates and Mana Tunnels cannot be used while transporting goods, and as such cross-continental travel must be done via sailing between the various ports of Erinn.
- Players can form Merchant Groups, allowing them to transport special goods as a party, either by land or via Airship.
- These goods have limited quantities which reset each Saturday at 7:00 AM Server Time.
- Trading goods from Beach of Scathach, Karu Forest, Connous Oasis, Lake Calida, and Zardine Beach are bartered for materials instead of Ducats.
- These goods have limited quantities which reset each Saturday at 7:00 AM Server Time.
Trading
From left to right, at most trading posts, you will find the NPCs responsible for the following:
- Transportation Helpers, filled in by Ogre Transport Helpers in Uladh and Belvast, from which you can buy Commerce Transportation mounts;
- Commerce Helpers, filled in by Goblin Trade Helpers in Uladh and Belvast, from whom you may buy and sell Commerce Goods to;
- Traders, filled in by Trade Assistant Imps in Uladh and Belvast, with whom you can exchange Bandit Badges, buy limited goods, and
Ambushes and Robberies

|
If a player is ambushed by a Bandit, they will automatically drop their goods. Once all the bandits are defeated, commerce continues as normal.
|
Rewards
- The Ducats earned correspond to
Original Price + Profit + Commerce Mastery Bonus. - The EXP obtained is calculated as:
floor(sqrt(Single Item Profit * Single Item Weight)) * Item Quantity * 30 * (1 + Commerce Mastery Bonus + Guarantee Bonus) - The Gold and Merchant Rating is equal to
Total Profit + Commerce Mastery Bonus. - The Seasonal Commerce Score is calculated as:
floor((((Selling Price - Original Price) * Item Quantity) / 17)Original Pricerefers to the current price players would pay without any price reductions.- Hovering over an item will show the Original Price and the price after reductions as separate lines.
Selling Pricerefers to the price players sell at without any bonuses.- Hovering over an item will show the Selling Price without any bonuses.
- The bonus from Selecting a Destination during Merchant Group Commerce will count towards Score.
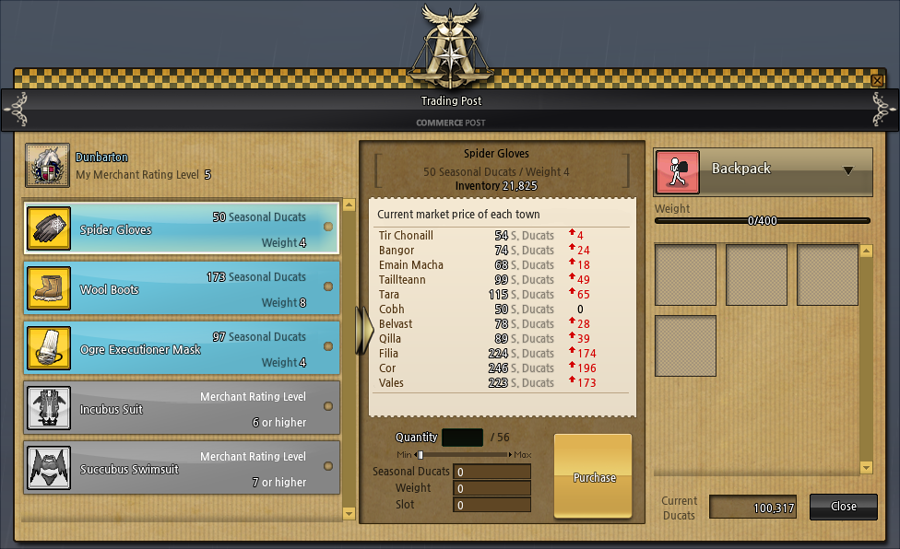
The trading interface.

Status message when beginning commerce.


Seasonal Commerce Ranking
- Players who perform a lot of commerce will increase their rank and be placed on a seasonal leaderboard.
- At the end of each season players will be granted reward based on their score, such as a Seasonal 2nd Title, Precise Reforging Tools, and Rebirth Potions.
Trade Goods
- Each town's Trading Post has their own stock of unique goods, which can be sold at other Trading Posts across Erinn.
- The prices of these goods change dynamically depending on supply and demand. At every even hour real-time (PST), rare Limited Quantity goods will restock that sell for a high price.
- Prices do not reset during a maintenance or update.
- Stock and prices do not vary per channel.
Penalties
- If you log-off, or disconnect during traveling, you will be able to resume when you log in, however you will lose 10% of original amount of goods.
- This counts as bandits stealing your goods.
- Players with Premium Service do not suffer this penalty.
Forfeiting Commerce
- You may forfeit the transport anytime by clicking the "Stop" button on the top right corner.
- You will lose 25% of the Seasonal Ducats that went into your goods.
- The stock of the Trading Post you purchased goods from will be restored.
- When forfeiting a transport that includes bartered goods or merchant group goods, any items originally used for the trade are not returned and exchange limits are not restored.
Gameplay Limitations
- Once your goods are loaded, the following occurs:
- You may not engage any form of combat nor use skills while you are holding the goods.
- Your damage output is reduced by 50%.
- The damage over time from Poison Attack, Mirage Missile, Dischord, and Puppet's Snare are unaffected by the damage reduction.
- You will be unable to enter the Housing Channel, any Homestead, Solea, or any "indoor" location.
- All types of Pets and Partners, excluding Pets and Partners with unique Commerce bonuses, will automatically be de-summoned, and cannot be summoned while commercing.
- If you enter an active Field Raid zone, any commerce partners present will be automatically unsummonned.
- If your Partner runs out of time or is unsummoned you will not lose any goods but you will not be able to resummon them.
- Alpaca pets are not kept summoned during Commerce, unlike Partners.
- All methods of Fast Travel become non-functional until the trade is completed.
- You cannot use the Auction House.
- You cannot Joust; doing so will cause an auto-fail when you enter the arena, and glitch you inside.
- This can be remedied by changing channels or relogging.
- You cannot partake in the Fashion Contest while you are trading.
- Attempting to take the runway will cause an error of registration and prevent anybody from participating in the Fashion Contest for that channel.
- When engaging in commerce and traversing Longa Desert, the game will prevent you from falling into the Connous Underground Maze.
Seasonal Score
getScore:floor(((sellingPrice-originalPrice)*quantity)/17)
| Seasonal Commerce Score Calculator Input Prices and Quantity, Auto-Calculates Score | |
|---|---|
| Original Price | name=originalPrice;default=0 |
| Selling Price | name=sellingPrice;default=0 |
| Quantity | name=quantity;default=0 |
| Score : formula=getScore; | |
getScore:floor(((sellingPrice)*quantity)/34)
| Barter Seasonal Commerce Score Calculator Input Value and Quantity, Auto-Calculates Score | |
|---|---|
| Selling Price | name=sellingPrice;default=0 |
| Quantity | name=quantity;default=0 |
| Score : formula=getScore; | |
Trivia
- According to the Trade Assistant Imp, the Falias Artifacts found in the shop were actually stolen from Falias.
- While controlling the Wagon and Sled, the player takes control of the Horses and Lead Dogs respectively, similar to riding the Alaskan Husky, Malamute and Reindeer pets with the ability to sled in snow.
- According to Eochaid's comments during An Unremembered Dream, Baby Potions are actually just fruit juice.
- Elvan Eggs are a Korean baked egg found in Korean Spas (called 찜질방 - jjimjilbang). They are traditionally made on (and get their name from) a type of quartz-porphyry stone (called 맥반석- maekbanseok, literally wheat/barley rice stone).
Gallery

Trade Assistant Imp in the window as it used to appear.
Promotional animated artwork of the Great Era of Commerce art.

Trading Post Icon.
High Quality version of the Commerce Qilla Icon.

High Quality version of the Commerce Filia Icon.

High Quality version of the Commerce Vales Icon.

High Quality version of the Commerce Cor Icon.

High Quality version of the Commerce Karu Icon.

High Quality version of the Commerce Oasis Icon.

High Quality version of the Commerce Calida Icon.

High Quality version of the Commerce Pera Icon.


Subcategories
This category has the following 2 subcategories, out of 2 total.
Pages in category "Commerce"
The following 13 pages are in this category, out of 13 total.